OneRNG Programmer/Serial Board
Change list
- 28th Mar 2015 - Converted to OneRNG version
- 2nd Oct 2013 - Created
Contents
- Introduction
- Hooking up Hardware
- Downloading a build system
- Downloading starting source
- Building the Programmer GUI App
- Using the Programmer GUI App
- Loading code
- Updating the Programmer's Firmware
- Downloads
- Credits
Introduction
Our programmer is a simple, cheap USB board
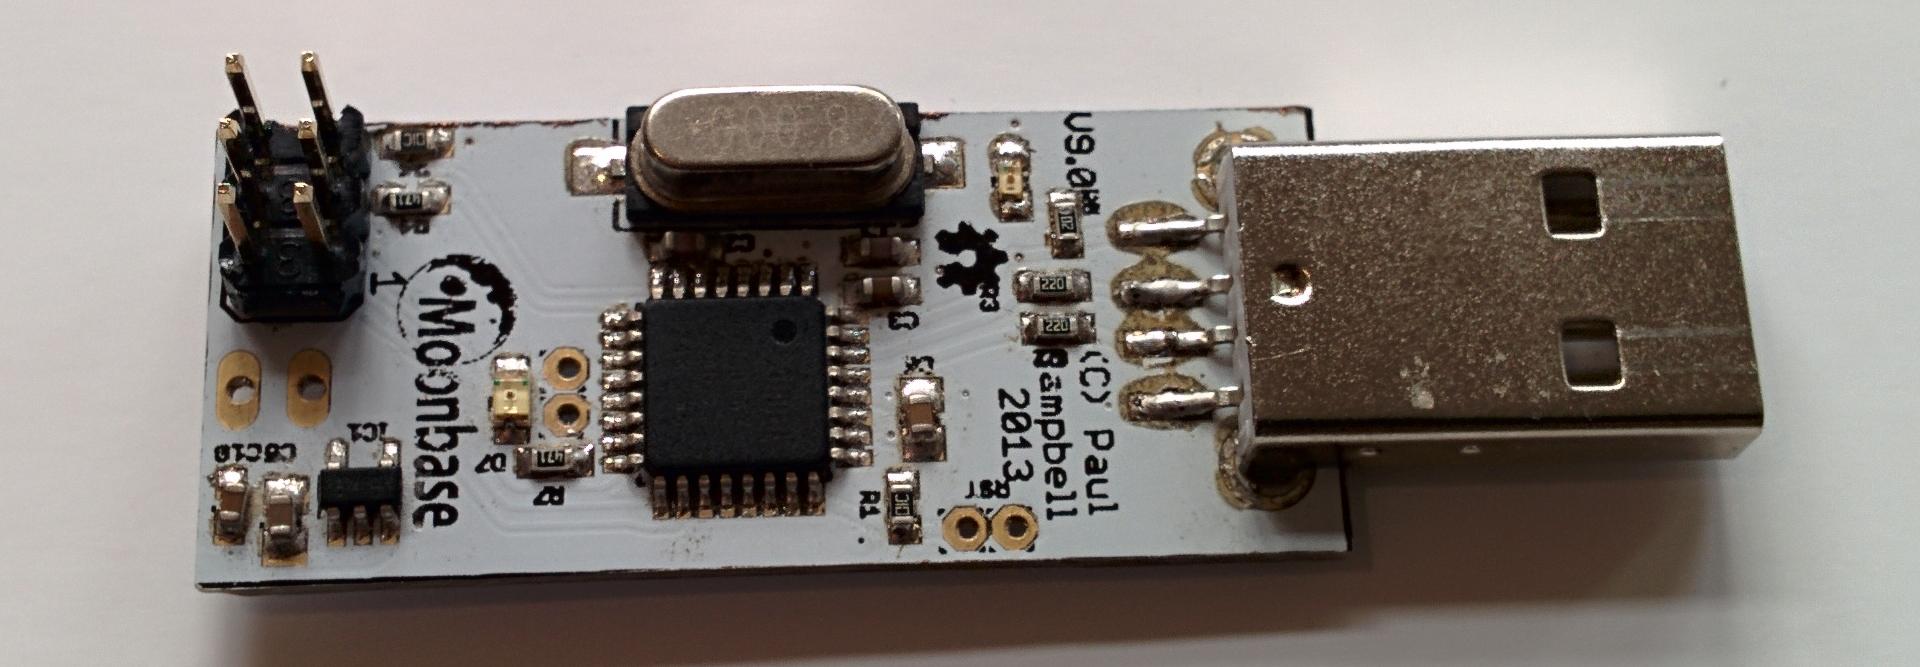
The only difference between this version of the programmer and our previous one is that we've replaced the cheap, unreliable USB connector with a more reliable one.
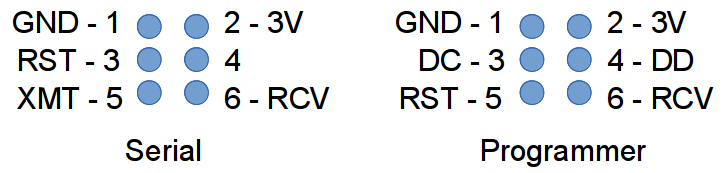
By default at power on it simply works as a serial connection, an escape sequence generated by the GUI software gets it into CC25xx programmer mode which changes the functional pinout:
Hooking up Hardware
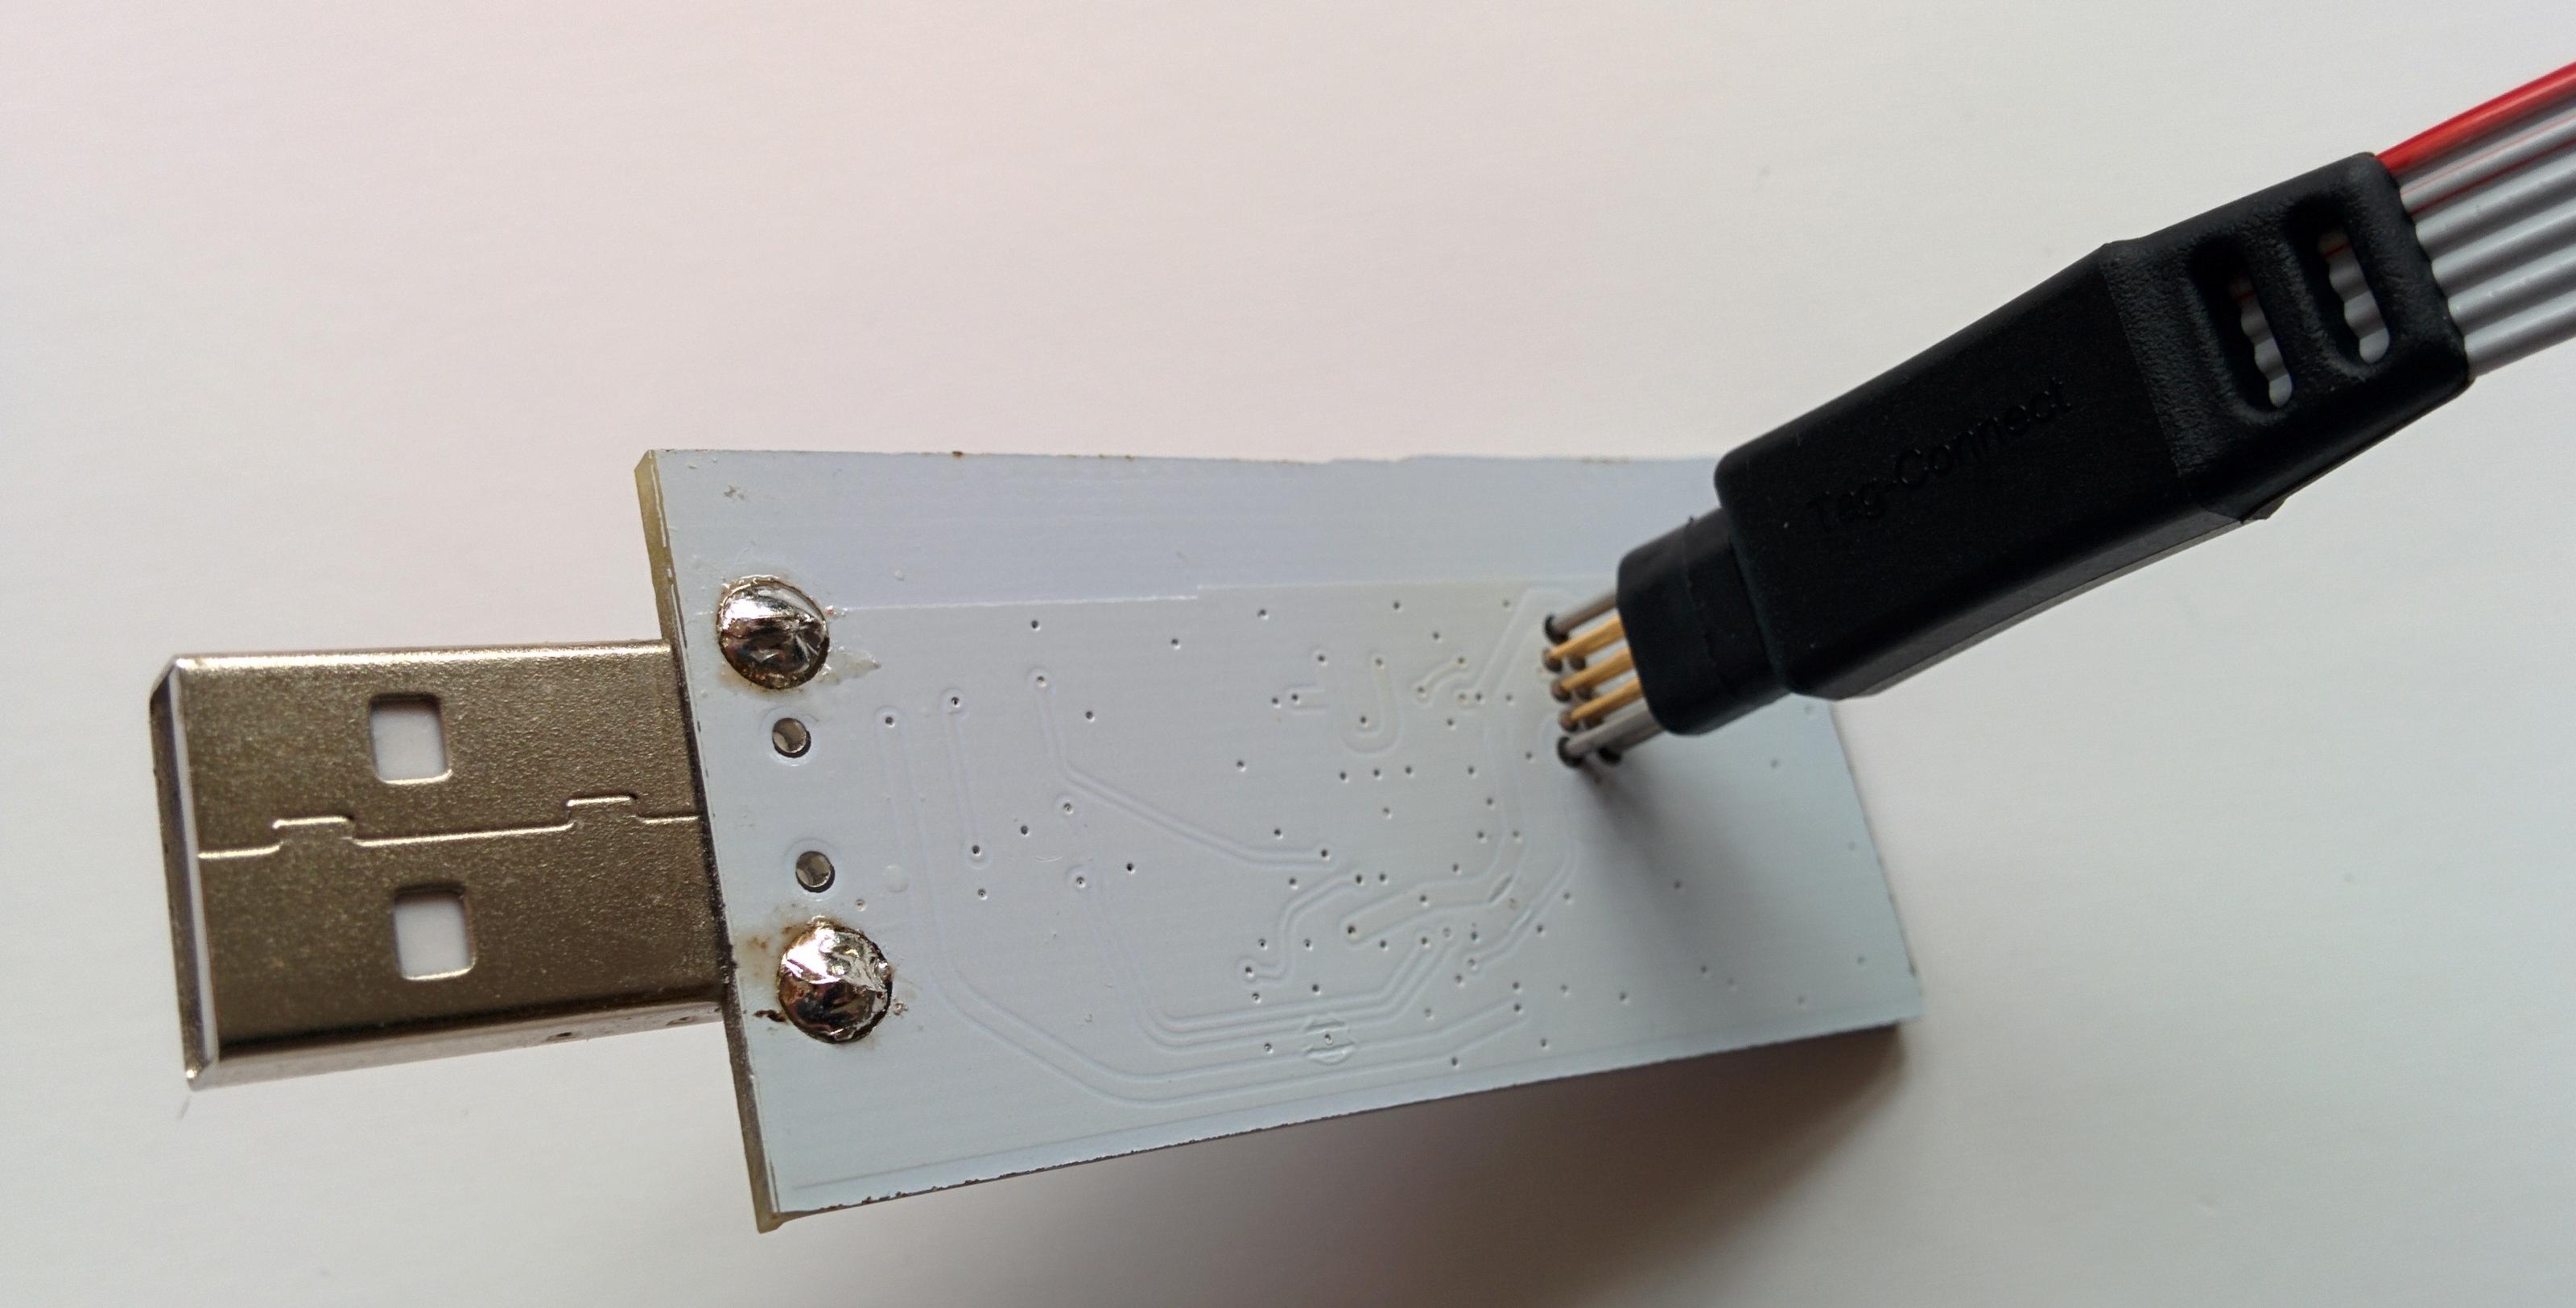
The basic connector is a 3x2 header and either a ribbon cable or a 6-pin TAB-Connect cable and pin header. To program a OneRNG you need a 6-pin TAB-Connect cable - this is included in the Kickstarter programmer kit, but for other combinations you will have to provide your own.
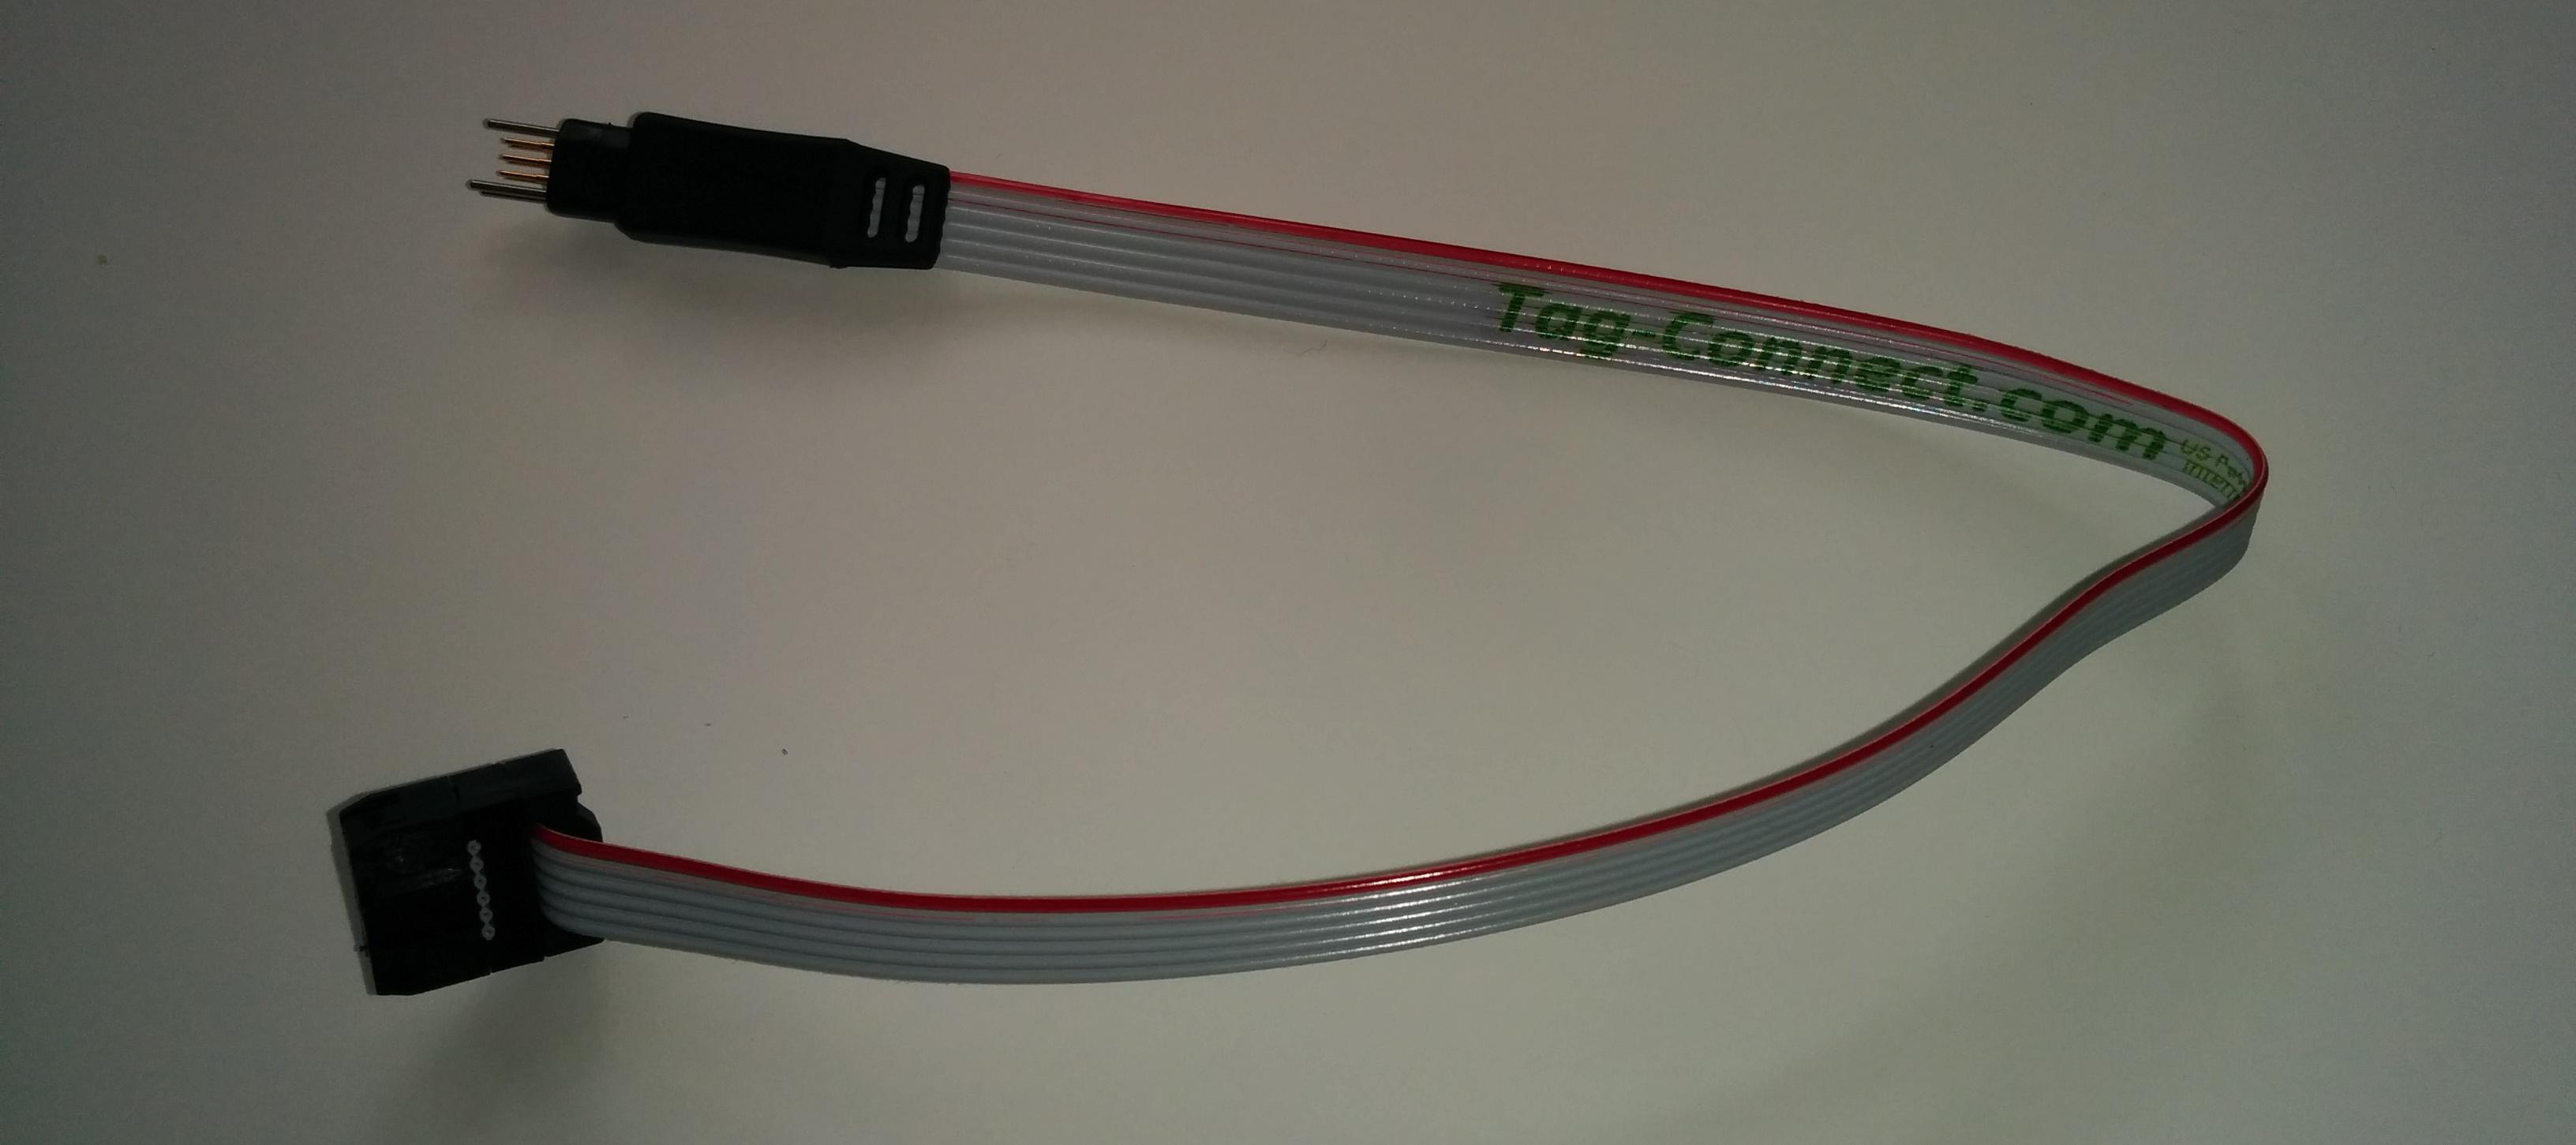
Connect the cable to the 6 pin cable header shown below:
Make sure that the cable is connected to the board the right way around - pin 1 on the cable, the side with the red stripe goes to pin 1 on the programmer.
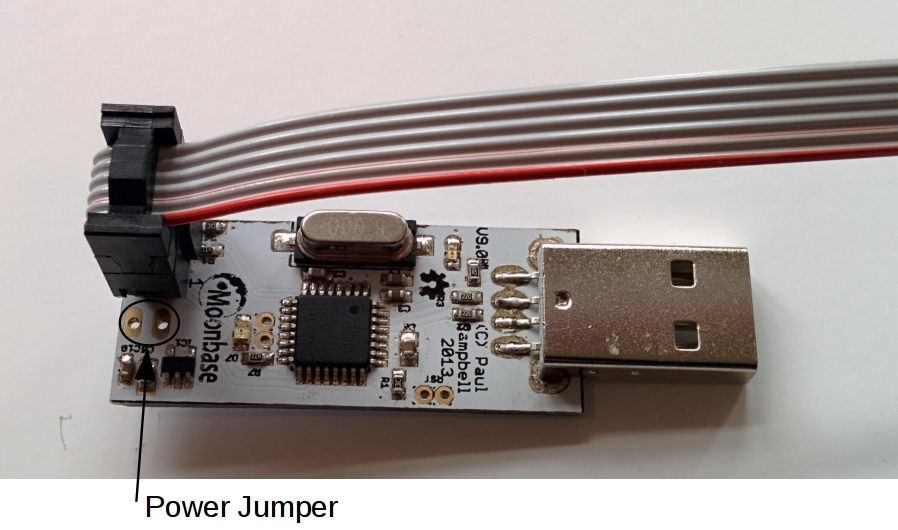
By default the programmer will power any board that it's connected to - so ALWAYS remove your OneRNG from your computer before programming it, not doing that can damage the programmer or the OneRNG
While most OneRNG users are unlikely to need this if for some reason you want to power your OneRNG from some other source you can disable this - on the bottom of the board under the area labelled "power jumper" above there is a trace between those two pins - use a modelling knife to carefully cut that trace to disconnect the power to the cable - if you like you can install a 2-pin header (not included) in the two holes there and then install a jumper so you can enable and disable power to the cable at will.Downloading a build system
We use SDCC as the C compiler and assembler in our build system - we provide a copy of the source we build from under Linux at http://moonbaseotago.com/cheaprf/sdcc-2533.tar.gz. This version adds an extra machine specific include file for the cc2533 and some minor tweaks to enable use of the second data pointer register.
- Linux: for linux users unpack this file, a simple "make install" from the top level may be all you need to do. If run into problems try "make clean;make install". Make sure that sdcc is included in your PATH (/usr/local/bin)
- Macs: we have no specific mac instructions - if you have problems please get in touch, if you fix problems also let us know how you got things working so we can update this document
- Windows: we have no specific windows instructions - if you have problems please get in touch, if you fix problems also let us know how you got things working so we can update this document
Downloading starting source
Our source is stored on GitHub at https://github.com/OneRNG/firmware grab a copy and install the source tree on your system.
It's based on the CC cheaprf system - source is available here: https://github.com/MoonbaseOtago/CC-System the OneRNG code has the RF portions removed and a hook in the main idle loop for collecting entropy. A detailed document on programming in this environment is available here. In particular it covers tasks and timers which are used extensively in the OneRNG source code.
Building the Programmer GUI App
The programmer is intended to be used with the programmer GUI 'ccload'
To download and build the GUI app for programming - grab a copy from GitHub: https://github.com/MoonbaseOtago/CCLoad
Building this app needs C++ and the QT4 (not QT5) libraries.
- Linux: simply type "make" at the top level
- Macs: we have no specific mac instructions - if you have problems please get in touch, if you fix problems also lets us know how you got things working so we can update this document
- Windows: we have no specific windows instructions - if you have problems please get in touch, if you fix problems also lets us know how you got things working so we can update this document
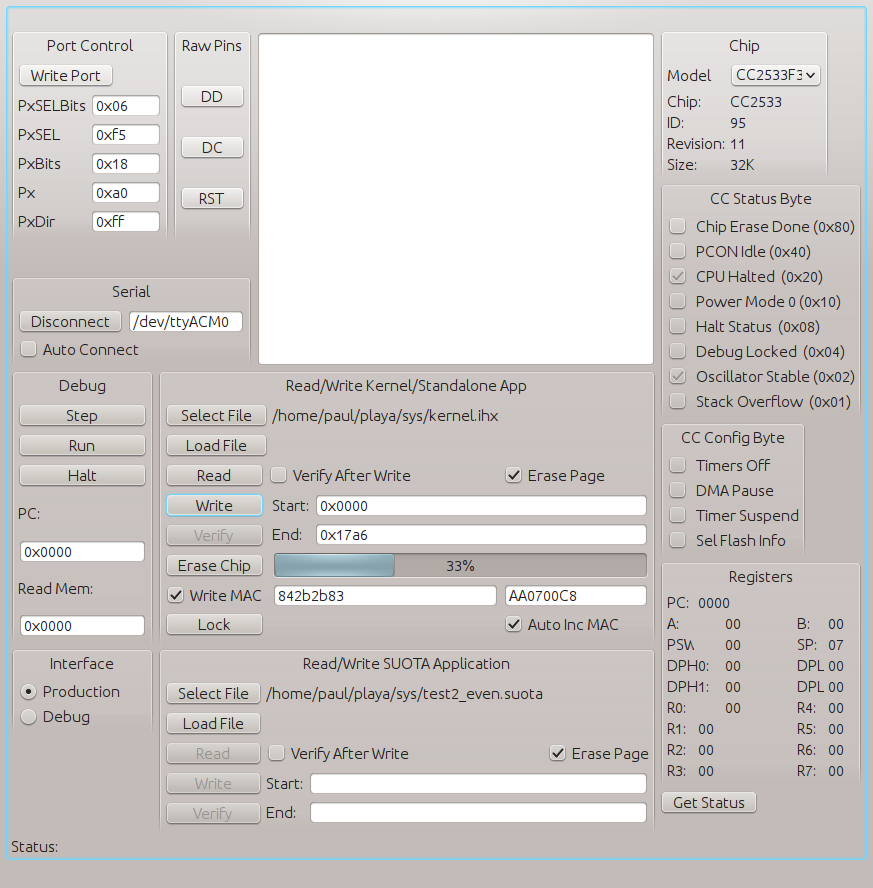
Using the Programmer GUI App
Run the app from src/ccload
You should see something like:
Now attach an 6-pin programming cable to your programmer and plug the other end into the programming connector under the OneRNG, you may have to remove the sticky label over the - you have to push it in and hold it while you are programming, push hard enough so that you feel the pogo-pins retract.
Plug the board into your computer and determine which device it's attached to:
- Linux: type 'dmesg' to see which serial device was allocated to you - if you have no other devices connected chances are it will be /dev/ttyACM0 - it will have a similar name (might be ttyACM1, ttyACM2, etc)
- Mac: ???
- Windows: ???
Type the name of the device you want to use into the "Serial" text box half way down the panel on the left hand side - the program will remember it next time. Press the "Connect" button, you should see the panel change to look like the following panel, if the name on the button doesn't change to 'Disconnect' it hasn't found the device, you may have typed the wrong device name.
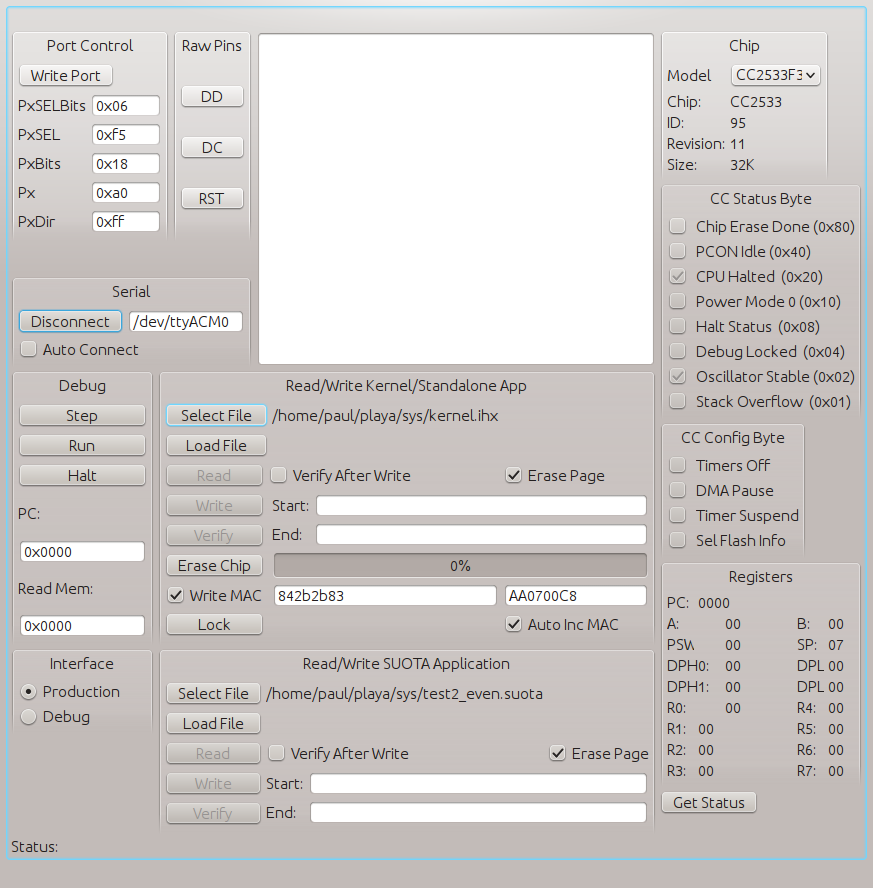
Note that the 'Connect' button has changed to 'Disconnect', the 'Chip' panel in the top right contains information about the chip found on the development board, the CC Status Byte tells you the development system's current state
In the programming GUI there are two sets of boxes for loading code - one for loading kernels and standalone apps and one for .loading SUOTA applications - for this example we're only using the one labelled "Read/Write Kernel/Standalone App"
Now's a good time to set up automatic MAC generation - check the "Write MAC" box, next to it are 2 text boxes put 8 hex digits into each box, check the "AutoincMAC" box, now every time you write a kernel it will get a unique MAC address assigned to the board. How should you find a unique MAC address to use - I steal one from an existing device that works in another domain: ethernet or wifi - put the first 8 hex digits of your laptop's ethernet mac address into the left hand box, and the last 4 hex digits, followed by "0000" into the right hand box.
Loading Code
Press the "Select File" button, it will pop up a file open dialog box, navigate to the place you built the OneRNG formware and choose the ihx file. Then press the "load" button to load the file into the GUI program - it will look something like:
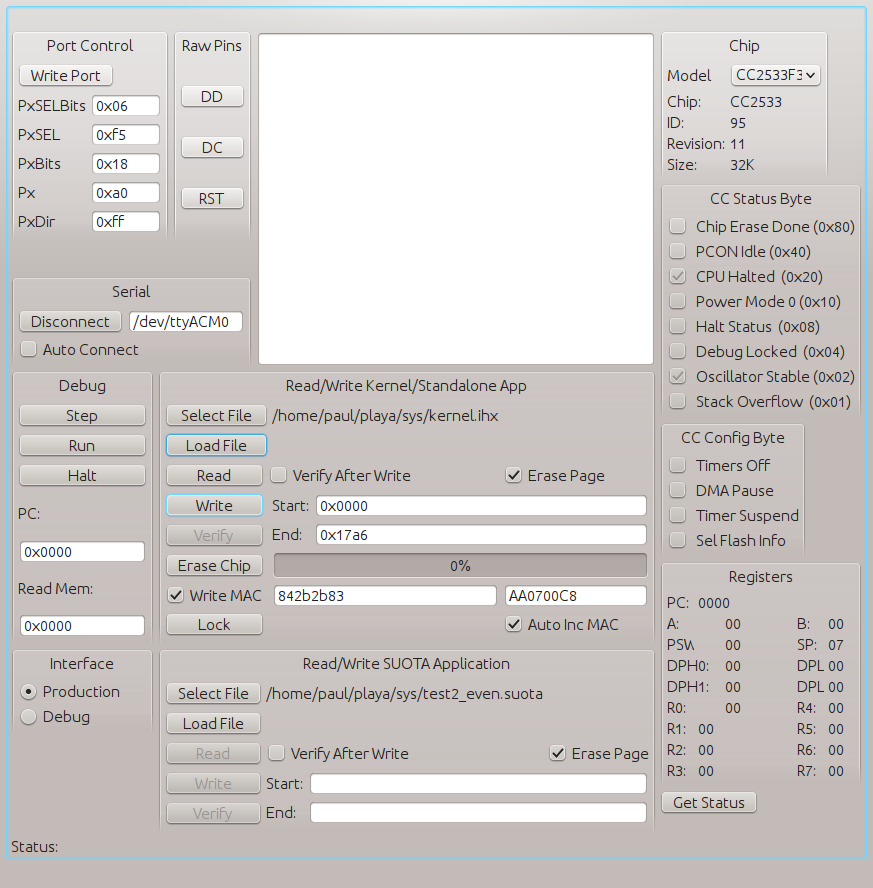
Next press "Erase Chip" to delete any already loaded applications and "Write" to copy the kernel image into the development board - normally we don't check "Verify After Write", it takes too long, only use it if you suspect a problem.
Notes:
- The "Read/Write SUOTA Application" is not used for OneRNG programming
- Always disable the 'Write MAC' check box
- Leave "Interface" set to "Production"
- When you're done you can click "Run" to start the program
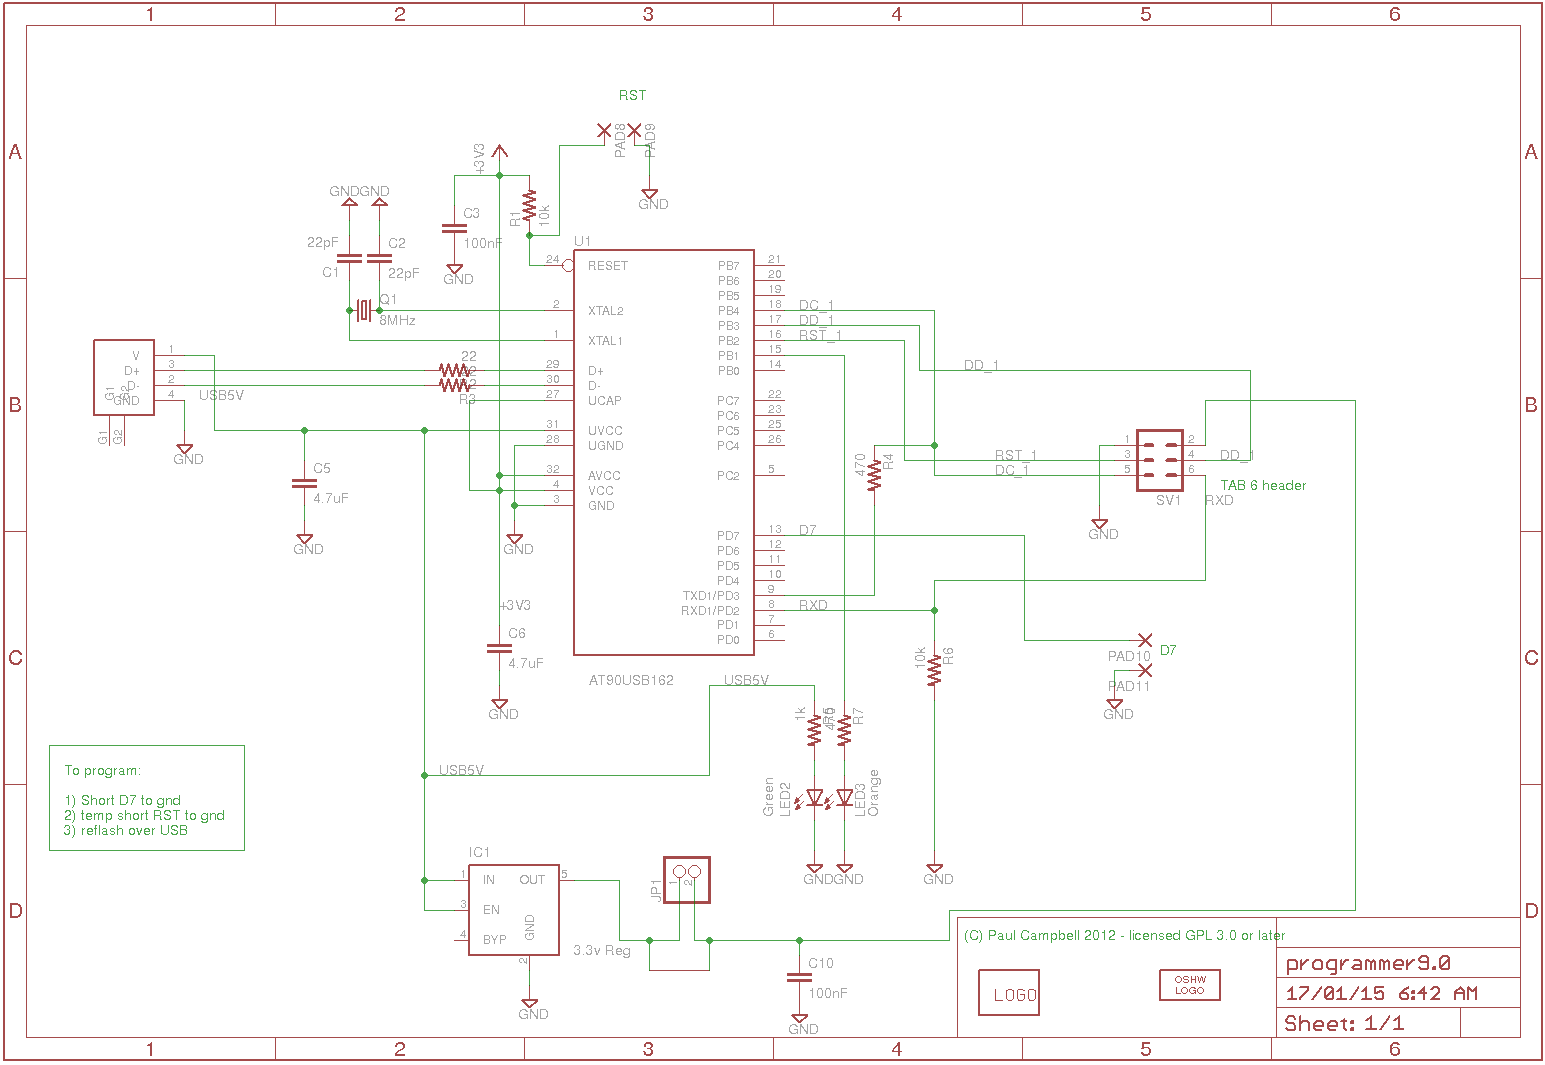
Updating the Programmer's Firmware
The programmer's firmware source is available on Github.
Normally you shouldn't need to load your own firmware but if you want to play go ahead - to program your own firmware you'll need to load the dfu-programmer application (Linux users will likely find it already available to them from their existing repositories).
To load new code you first need to put the board into the firmware loading mode:
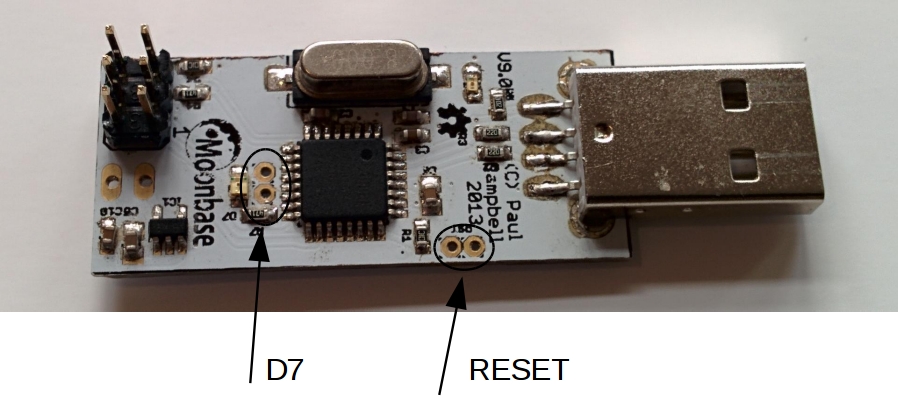
Plug your programmer into a USB port, short the two 'D7' pins on the board, then short the two 'Reset' pins (I use two pairs of fine tweezers to do this) - the board is now in firmware reload mode, remove the reset short, taking care to keep the board powered on. Once you've done this you need to erase the programmer's CPU:
dfu-programmer at90usb162 erase
Then program it with new code using the command:
dfu-programmer at90usb162 flash Benito7g.hex
Now unplug your programmer and plug it back in, it will come up with the new firmware.
Downloads
Software and hardware designs can be downloaded from here:
- Firmware source
- Schematic
- programmer9.0.sch Eagle schematic
- programmer9.0.brd Eagle layout
Credits
No one does this alone, the great thing about open source is that we all get to stand on the shoulders of giants
- We use the SDCC 8051 C compiler, assembler and linker - many thanks.
- The USB to serial portion of the USB programmer/serial dongle was copied from the excellent Benito project - thanks for sharing!
- We based our programming GUI loosely on CC.Flash from https://github.com/x893/CC.Flash - thanks
